


Tips For Loading T-Shirts On Your Heat Press | What does "Threading" Mean?
Browse Video Categories
Transfer Application | Artwork & Apparel | Easy View Tutorials | Webinars | Ordering Tips | Business | Heat Presses
Hey Friends! Dave here with Transfer Express, and today we’re talking all about the different techniques for loading a heat press.
There’s a couple ways you can get your garments on your heat press, so we’re going to break down some heat press capabilities, most importantly; threadability. Then, we’ll explore the pros and cons of threading (or dressing) your garment on the lower platen versus just laying over top.
First up, you may be asking, “What does threading mean?” Well, threading is essentially dressing the lower platen like its a mannequin or opening the shirt like it’s a pillowcase over a pillow. There are some advantages and disadvantages to this technique, but we’ll dive into that in just a minute.
Let’s chat heat presses. There’s three heat press types when it comes to the lower platen style: Threadable, Semi Threadable and Non-threadble (if they don’t mention anything about it in the product description as a capability, it’s probably not threadable).
Our Auto Clam right here, out-of-the-box is NOT a threadable press, that is, until it’s coupled with the Caddie Stand, or the Counter Caddie Stand. Then, we unlock the full capabilities allowing us to thread the garment like we have our press.
Without the stand, you can see the bottom of the press is right here, which would contact a table, not allowing the garment to go over the press.
Some heat presses, like the A2Z swing away press, are labeled as “semi-threadable” which means the garment can go under the lower platen, but not all the way. For most t-shirts you’ll be able to load the t-shirt on the platen fine, but for smaller sizes you may see some stretching of the garment when trying to fit it nice and flat on the garment. That stretching is not something you want to see, as it can skew or warp your prints.
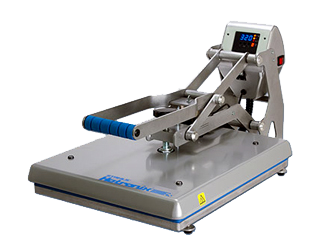
Other heat presses, like the Hotronix Fusion Heat Press is fully threadable out of the box, thanks in part to the gooseneck arm on the base that holds the lower platen and it’s innovative base design.
If you’re shopping for a heat press to start your apparel printing adventure, or if you’re just looking to upgrade, a threadable platen is definitely a feature to look for. I personally love the fully-threadable presses, as with my traditional screen printing background, the threadable lower platens are very familiar to loading t-shirts on a traditional screen printing press.
Of course, with a threadable press, you always have the option to thread or just place the garment overtop, a luxury not available on non-threadable presses.
Before we move on, one thing to consider for fully-threadable heat presses is a Quick Slip Pad Protector. These inexpensive accessories make loading t-shirts a breeze.
Not only does it protect the foam rubber here on the lower platen from ink and wear, but it allows the t-shirts to easily slide on and off, reducing the grip of these pads and extending the lifespan of your lower platen.
Now that we’ve covered the heat press capabilities, let’s take a look at some pros and cons to each method.
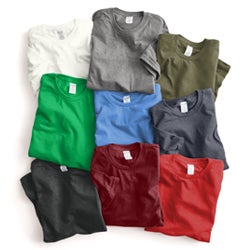
First up, let’s look at the layers of fabric we’re dealing with. When threading onto the lower platen, we are only dealing with one layer of fabric. Making it super easy to eliminate wrinkles. When just laying the garment over the platen, we have two layers to worry about.
Any wrinkles in the bottom layer can impact the quality of your print and may affect the pressure of the press too. This is less noticeable on larger garments but smaller garments may require a little extra time and finesse to ensure both layers are wrinkle-free for the optimal press.
This is also super important when printing the backs of t-shirts, polos, hoodies, jackets or any other garments with seams or obstructions like zippers or buttons. Just on t-shirts you can see the collar is lower on the front than on the back, and if you’re trying to print an upper back location, we’ll need to roll the collar up out of the way of our print location. When threading, the collar on the front is below the platen, giving us a nice smooth surface from edge to edge.
One downside to threading the platen is the shirt will always be upside down as it’s facing you, as the vast majority of heat presses can only be loaded from the front. But, with just a couple presses, you’ll get used to having the shirt (and the print) upside down.
It is something that can lead to a few misprints when you’re just learning. I’ll admit, it is slightly disorienting when you’re first trying to figure out which way is up, and which way is down and then using a transfer, like our Goof Proof transfers, that are mirrored on the carrier sheet. I promise, you’ll get the hang of it.
With laying the shirt over the platen, you have the ability to place the shirt however you like. Right side up, upside down, or even sideways if you want to reduce your printing area, like if you need to get a hoodie pocket off of the platen for an even pressing surface.
Both methods make aligning the shirt straight on the press easy. With just laying over, we can ensure our sides are equal-distance from the edges of the platen, and when threading on the shirt, we’ll just check the side seams or the side fold line against the platen’s edge and ensure it’s equal on both sides.
If you’re interested in more print placement and alignment tips, we put a full video together detailing all of the methods for aligning your prints.
The last comparison we can make for our methods of loading our press is with jerseys or any mesh product. If you’re just laying over the press, you have to be cautious when printing these types of garments, as the ink from our heat transfers can seep through the holes and essentially glue the garment together - not good when the intended use is for someone to wear it!
This is easily fixed with just simple parchment paper, craft paper, cover sheet or other heat-resistant insert placed inside the garment before printing. When threading on the platen, we’re introducing the platen between each side of the garment and with the non-stick Quick Slip Pad Protector, we don't even have to worry about ink sticking to our platen.
Of course, if one method is working for you, there’s no need to change it! I encourage everyone to find the way that works best for you and run with it. Whatever you’re more comfortable with, while getting quality prints is the best way to print t-shirts.
Be sure you’re subscribed to stay up to date on all of the videos we’re dropping every week on the Transfer Express YouTube channel. But, until next time, I'm Dave, happy pressing!