


Heat Transfer Troubleshooting Tips: How To Print T-Shirts Like A Pro
Browse Video Categories
Transfer Application | Artwork & Apparel | Easy View Tutorials | Webinars | Ordering Tips | Business | Heat Presses
Hey friends, Dave here with Transfer Express and today we’re covering some basic troubleshooting and tips to ensure you’re getting quality, consistent results with your screen printed and digital heat transfers every time.
Whether you’re a pro or a beginner, there’s probably something we’re going to cover today that can help you and your t-shirt business get the best results with your heat press. So are you ready to press it like it’s hot? I am, let’s get to it!
When we’re talking about heat transfers, there’s always three elements at play: time, temperature and pressure - and all of those we can set on the press.
We’ll be using our Goof Proof screen printed plastisol transfers here today, so we can check out the instruction sheet for the correct settings.
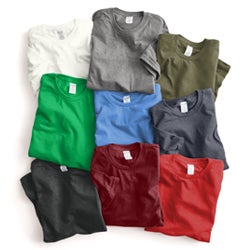
We have instructions for 100% cotton or poly blends and also 100% polyester. Since our garment we’re using today is a cotton heather blend, we’ll opt for these settings on the left. So, 365 degrees, 4-6 seconds for time and medium to firm pressure (6-8 on a Hotronix press).
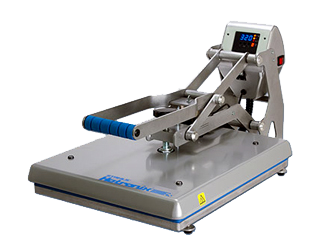
Back at our press, setting temperature is easy, clicking the middle button to enter the menu where we will set our temperature, and adjusting using the buttons on either side, up and down. If you don’t have a Hotronix press, we recommend bumping the temperature by 10 degrees.
Next, we’ll use the menu button again to set our time. This Hotronix Auto Open clamshell press we’re using today does have a dual stage timer, so there’s one more timer menu before we exit the menu. On almost all heat presses, if you don’t exit the menu, the heating element won’t heat up, and if it has any auto features, they’re likely not going to work- just like the magnetic auto-open here on this press, it will not lock down when the menu is active.
Without the correct temperature and time, the inks will not cure correctly, leading to the transfer peeling up or cracking if the inks are cooked a little too much, known as over-curing.
Once we have our temperature and time set, it’s time to set our pressure. So without any garments on the press we can close the press and see what our digital readout is displayed here on the press. One thing I love about the Hotronix Auto Clam and Fusion presses is the digital pressure readout. It really simplifies setup and takes some of the guesswork out of setting up your press.
If your press doesn’t have a pressure reading, that's A-ok! You can take small pieces of paper about the size of a dollar bill and place them at each corner of the press, half on and half off the platen. If you can pull them out easily, your pressure is too light. They should be locked in there pretty good, with maybe a little movement for a medium to firm pressure. You can always adjust your pressure using the knob at the top of the press. With too little pressure, the transfer may not apply or fail when washed. With too high of pressure, you may squish the inks, leading to excess ink spreading, making small text illegible and closing in small negative spaces.
I like to pre heat the lower platen when I first start printing each day. I’ll run the press through a few cycles, or at least 15-30 seconds of contact with the upper platen to get everything warmed up.
Now we’ll load our garment on the heat press. There’s several ways you can do this, and it’s mostly personal preference. I like threading the garment onto the press, or opening it up like a pillow case over a pillow. But you can always lay it right on top, in whatever direction is easiest for you.
Regardless of how you’re loading the shirt on the press, ensure you have all collars, cuffs and seams off of the printing area and the printing area is free of wrinkles or other obstructions. Without a flat, smooth surface your transfer may pick up any of those wrinkles in the final print.
We want to ensure our seams and collars are off of the printing area because that can affect our pressure. Especially bulky collars or seams on thicker garments like hoodies. Without good, firm, even pressure our transfer may appear to apply fine, but it may start to deteriorate prematurely when laundered. So it’s best to slide those obstructions off of the printing area.
There may be some cases where you can’t avoid any of these obstructions and that's when you can use a smaller platen, if your heat press has the capabilities for interchangeable platens, or you can use a Print Perfect Pad or a mousepad to raise the printing area. You will need a flat, firm surface for these transfers, so unfortunately, heat printing pillows will be too soft and can affect proper application. Do not use them with any heat transfers requiring more than low or medium pressure.
Next, we’ll pre press our garment. In this step we’re removing moisture and any small wrinkles in the fabric. The moisture is what we’re most worried about. T-shirts soak up moisture from the air like a sponge, and when heat pressed, they release this moisture as steam, which goes up. This can be very bad if the moisture in the garment is evaporating when we’re trying to push inks down, leading to bubbling or wrinkling in the inks or transfers that are not completely adhered to the fibers in the shirt.
Another thing to check during your prepress is how much the pressure has shifted with the garment on the press. Here you can see we increased the pressure readout by one by adding the garment. You can always adjust as necessary.
Now we’re ready to place the transfer on the shirt. Before pressing for the first time, I like to double check all of the elements and details look as they should. This way, if I’m unsure of a detail or something looks off, I can press the design on a test garment instead of possibly ruining an expensive garment. This one looks perfect, so we can go down straight on the garment. With our screen printed transfers, we’ll always provide you with at least one extra transfer for reference or testing.
One common issue we see a lot is prints being too low - the dreaded belly print. Of course you can use one of these placement rulers to help with placement or eyeball it or use your fingers. We’ve got an awesome placement and positioning video.
Once we’re set with the placement, with this one being a tall graphic we’re going to keep our design no more than an inch down from the bottom of the collar. Now, it’s time to press!
Since our instructions told us to peel hot, we’ll peel this carrier in a smooth and even motion immediately when the press opens.
There you have it, a nice, perfectly applied screen printed transfer! You’ll notice the inks appear to sit down into the fibers of the garment, and it’s not sitting like a sticker on top of the fabric. This is a sign of a perfectly applied heat transfer.
It’s important to note, we didn’t use any cover sheets or Teflon covers. Placing anything between the transfer and the heating element is going to block heat. For screen printed transfers you need to ensure the correct temperature is reaching the inks, that’s why we don’t recommend them.
Some cold peel transfers do require a cover sheet, but they will be included with your order and the instructions will say to use it during application. This is mainly on plastic carriers that can have static build up and may cause the transfer to peel early when the press opens.
If your transfer is still not applying correctly, it’s time to check the heat. You can use an IR thermometer to check the surface temperature of your heating element, or the affordable Heat Press Test Strips that measure the heat when pressure is applied. The IR temp guns are great, but with the non-stick coating on the heating element here there’s a wide margin of error with the IR reflection, so you can get a general idea for the temperature, but it may be up to 20 degrees off in either direction.
If you don’t have test strips or a temperature gun, and your transfer is failing in one spot or area, try rotating the garment or press in another area of the press. Some heat presses can develop cold spots that lead to just one area having application issues.
If you’re still having trouble, you can try applying a different transfer. This can help you determine if there’s something wrong with the press or the specific transfer. The free samples you received when signing up for an account are great for this. And if you ever need more, all you have to do is ask.
Now if those other transfers are having issues too, it’s most likely your press; time to check the temperature or pressure again. If the other test transfer applies fine, you should contact us immediately. Submitting a resolution in the Resolution Center of your account dashboard connects you to the experts that can look up the specifics of your order and offer tailored solutions for your specific project. We’re dedicated to the success of your t-shirt business, so we’ll do everything in our power to make it right.
Be sure you’re subscribed to stay up to date on all of the heat printing tips, tricks and advice we’re dropping every single week on the Transfer Express YouTube channel. But, until next time, I’m Dave, Happy Pressing!