


Beginner T-Shirt Printing Tips | How To Print T-Shirts Like A Pro
Browse Video Categories
Transfer Application | Artwork & Apparel | Easy View Tutorials | Webinars | Ordering Tips | Business | Heat Presses
Hey Friends, Dave here with Transfer Express and today we’re going to be covering some basics if you’re just getting started printing t-shirts.
We’ll be printing our t-shirts using a heat press and screen printed transfers, but a lot of the principles we’ll talk about will still apply to almost any way you can print a t-shirt - be it using vinyl, screen printing or even sublimation.
We’ve got a lot to cover, but I’ll try to get you to printing like a pro in no time, so.. let’s get right to it.
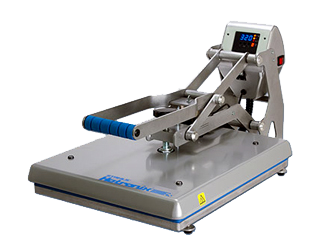
Printing t-shirts with a heat press is the fastest and easiest way to do it. I’ve been printing t-shirts for well over a decade now and pretty much any way you can ink to fabric, I’ve done it. From manual screen printing and pulling squeegees to sublimation and DTG, even cutting heat transfer vinyl and yes, my favorite, screen printed heat transfers.
But there’s some common tips I want to tell you about so you can reduce your frustration with the learning curve and jump out of the gate printing t-shirts like a pro!
Starting off, the first tip here is follow the application instructions. Regardless of your print method, if you don’t follow the instructions for curing or applying your inks, you’re going to have a bad time.
All of the transfers here at Transfer Express come with a nice little sheet that lets you know what settings to set your heat press at, but you can still find them online.
Not all heat transfers are created equal, and there’s three elements that matter when heat applying - time, temperature, and pressure. Use the settings designated for the transfer type you’re using.
We’ve got the Goof Proof screen printed plastisol ink transfers here with us today. And looking at the instruction sheet, we have two separate settings for our heat press. Since we’ve got 100% cotton shirts we’ll be printing on, we’ll use those instructions.
Set your press at 365 degrees, 4-6 seconds, medium to firm pressure (with the knob on the top).
You can see how important the settings are here - say after we were done printing these screen printed transfers, we would move over to heat transfer vinyl, where 365 degrees would most likely over-apply the transfer, burning off the adhesive instead of properly melting it into the fibers of the t-shirt.
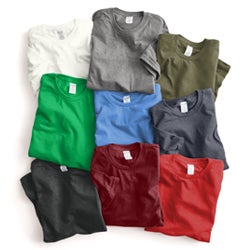
The next step is loading our shirt onto the heat press. It makes everything easier with your print placement to align the shirt on the heat press consistently. Of course, my favorite way is opening the shirt like a pillowcase and threading it onto the lower platen of the heat press.
However, many presses don't have this capability, so I'll show you what it looks like to just lay the press over the lower platen. First we’ll want to make sure we’re grabbing the seams on the top shoulder here in the same spot on each side, just to ensure the garment is not twisted or skewed when we’re laying it down.
T-shirts aren’t like paper, they’re meant to fit around a three dimensional form… US! So they can be a little tricky to get squared up at first. Don't worry, you’ll get the hang of handling blank shirts in no time!
The trick is to try and trace any seams around the platen and ensure they’re equal on all sides. Don’t just go off of the shoulder seams, because garment fabric can twist easily, so check down the sides to ensure the body of the shirt is straight on the press. Also, try to keep the fabric gently laid over top - any twisting or pulling will rebound when you take it off the press, leading to warped or skewed prints.
One of the most important things to keep in mind is giving yourself a nice smooth, flat, even surface for printing. This will help you achieve a nice smooth and even pressure across the entire surface area of your press, leading to perfectly applied transfers.
So, be sure to keep all collars, wrinkles and seams off of the printing area. We’ll always pre-press our garment before printing to remove moisture and wrinkles and this is a great opportunity to see if the press is closing properly or if your pressure needs adjusted. When you close the press, it will also highlight any wrinkles in your t-shirts that should be smoothed out before printing.
After we’ve moved all collars and seams off the press, let’s pre-press the garment. One of the most overlooked steps with heat printing is the pre-press. T-shirts soak up moisture from the air like a sponge, leading to evaporation when you hit it with heat from the heat press. When you have moisture in the form of steam pushing upwards, the transfer you’re trying to push down is going to have a bad time properly adhering to the fibers in the shirt. While it might look ok, it’s going to crack or peel after it runs in the washer a couple times. So always pre-press for the best prints.
Now that we’re loaded and pre-pressed, let’s grab our transfers. Here is one design I already removed from our gang sheet. Now, gang sheets are just the industry nickname for these transfer sheets that have multiple pieces of artwork grouped together on them. They’re great with transfers because you commonly pay for the sheet size and not the amount of inks you use, so the more you can fit on one page, the more profit you can pack into one sheet.
Some transfers come on a clear plastic carrier, while some come on paper carriers. The plastic ones are great because you can see the exact placement, but here on the screen printed transfers, they have to be paper - but you can still align them perfectly.
Before we head back over to the press, let’s hold it up to the light and fold each edge of the ink to each other. That way, regardless of the amount of paper on each side of the design, we’ll know where the actual center of the artwork is. Once you line up each edge of ink, we’ll gently crease the top and bottom of the release carrier. And you can see, just a little pinch allows us to create a great centerline for us.
Let’s eyeball this up to the collar and center it.
Now for different placements, we put a whole video together talking about placement and positioning that really helps dive into additional locations, but for today, we’ll just be doing a standard center chest. For most sizes of t-shirts, you’ll most likely be in between 1.5-3” down from the collar.
We have a couple ways to do it. My favorite, the 3 finger rule - simply taking 3 of my fingers and aligning the graphic exactly 3 fingers down from the bottom of the collar seam. You can also use one of these handy t-shirt rulers, which hey, look at that, is just about the same distance as my fingers.
Now be sure you know where the graphic starts on the carrier and not just the paper liner, so if you have to peek, just peek and compensate as needed.
Then we press and peel. The peel is important too, because different transfer types have different peels - hot, warm and cold. These Goof Proof transfers we used today are a hot peel, so we’ll peel immediately when the press opens. Warm peel would be waiting for 3-5 seconds after opening the press to peel and cold peel means room temperature - commonly 3-5 minutes after pressing. If your transfer is a cold peel, remove the shirt from the press to cool completely. Sitting under this heating element is going to keep it warm.
We did just release these helpful troubleshooting tips in this video right here, that we’ll link down in the description below if you’re having any application troubles.
Of course, here a Transfer Express we’re always happy to help - just give us a call, email, chat or submit a resolution in your order dashboard for some immediate assistance.
We’re dedicated to helping you and your t-shirt business succeed with tons of inspirational ideas, marketing tips and tricks, heat transfer application education and so much more. Be sure you’re subscribed to our YouTube channel to stay up to date on all the new videos we’re dropping here weekly.
Until next time, I'm Dave, happy pressing!